wiki
- Documentation
- Environmental Setup
- File Structure
- Bot Token
- GitIgnore Notes
- Bot Main File
- Error Messages
- Making a New Feature
- Getting Data
- Code Testing
- KeyCloak SSO R&D
- Git/GitHub Workflow
Documentation
Environmental Setup
Getting Started:
Learn:
- Learn Linux/Bash shell basics: Bash and GitBash for Beginners
- Learn Python basics: Python Basics Course
- Learn Python Async IO: AsyncIO Documentation
Install:
- Install Git Bash shell: GitBash for Windows
- Install Python: Python for Windows
Creating a Python Virtual Environment:
-
Navigate/create directory (folder) where the project is
-
Create the python virtual environment
The command
python -m venv .venvis used:-mruns a specific Python modulevenvis the module for creating virtual environments.venvis the name of the directory for the environment
-
Activate python virtual environment
Inside the project directory (parent of
.venv), run:. ./.venv/Scripts/activate.is shorthand forsource./runs a script using a relative pathactivateis the script that starts the environment- You’re in the virtual environment if you see
(.venv)in your prompt
-
Using Python and Pip in a virtual environment
- Use
.venv/bin/pipand.venv/bin/pythonto use the environment's versions
- Use
-
Running the bot for the first time
-
Run the following commands inside the virtual environment:
.venv/bin/pip install httpx .venv/bin/pip install discord .venv/bin/pip install pyyaml .venv/bin/pip install audioop-lts .venv/bin/pip install apscheduler -
If you get a "module not found" error, try installing that module with
pip.
-
-
Deactivating the virtual environment
-
Navigate to
.venv/Scriptsand run:deactivate -
If
(.venv)disappears from your prompt, it worked.
-
-
Creating a server and bot account


File Structure

This is what the project will look like at its parent folder level (top level).
main.py:
- This is the core file of the Discord bot where the main functionality is implemented.
- It initializes the bot, loads the different cogs (modules), and handles events.
- Team members are not required to modify this file, allowing the functionality to remain stable as they develop features in their own cogs and helper functions.
cogs/my_cog.py:
- This file is designated for specific features or commands that can be added to the bot.
- Team members can design their own cogs by defining classes here, which inherit from the base classes provided by
Discord.py. - This modular approach enables each member to work on their features independently.
utils/:
- This where we will store source files which aid cog functionality. Within this directory, there is also a
helpers.pyfile that houses generic functions available to all cogs.
utils/helpers.py:
- This file is intended to contain utility functions that can be used across different modules of the bot.
- Team members can develop functions that perform specific tasks and can be used in their cogs, promoting code reusability.
cache/:
- This folder is used to store sub-folders containing cache files for the bot.
config/:
- This folder is used to store configuration files for the
bot/cogs.
\
Bot Token
Bot Token:
- The bot token is the password for the bot.
- Create a
.bot.yamlfile in the same directory as the repository. - Add
token: {your token}to the file (without the brackets)(this is YAML format for a python dictionary).
GitIgnore Notes
.gitignore file
We will often want to add files to the repository directory just to make the bot run on our personal machines. We may not want to include these files in the actual repo as they are specific to testing. For instance, a config file that stores user information of the server that the bot is running on would be an example. We would not want user information of the test environment going on the main repository.
This is accomplished by adding these files to a file called .gitignore. Just add file or directory names to the file. If the file or directory you want to ignore is not in the main directory, add another .gitignore file in its directory.
Example:

Location of the .gitignore file

NOTE: Comments can and should be added for each entry explaining why or what the entry is for. Comments are denoted by the ‘#’ at the beginning of the line.
Example of gitignore in sub directory:


NOTE: The ‘*’ is a bash wildcard character that represents all entries in a directory. The ‘! .gitignore’ tells git to not ignore the .gitignore file; since we are ignoring all files in this directory.
Additional information for git ignore: gitignore documentation
Bot Main File
Logging Level:
- Ex:
logging.basicConfig(level=logging.INFO)- This code sets the logging level of the bot. Determining the type and amount of verbose messages sent to the console(terminal) where the bot is running.
level=logging.INFOis the most basic level with minimal output. This could be replaced withlevel=logging.DEBUGfor more detailed information.
Intents:
- Ex:
intents = discord.Intents.all()- Intents in discord are like filters for the types of events the bot will see. The above code grants all intents(ONLY FOR TESTING, intents should be regulated for real world use).
Types of Intents:
- Privileged Intents: These require explicit permission to use. You'll need to enable them in the Discord Developer Portal for your bot. Examples include:
GUILD_MEMBERS: Allows the bot to receive member-related events, such as when members join or leave the server.MESSAGE_CONTENT: Allows the bot to receive the content of messages. Necessary for bots that need to read message content (e.g., for keyword detection).PRESENCES: Allows the bot to see members' online/offline statuses.
- Non-Privileged Intents: These are enabled by default and don't require special permission. Examples include:
GUILDS: Allows the bot to receive events related to guilds (servers) like server updates and roles.GUILD_MESSAGES: Allows the bot to receive messages sent in text channels.GUILD_REACTIONS: Allows the bot to receive events related to message reactions.
Bot Token:
- Tokens are generated specifically for a bot as its “password”. They should not be stored in any of the bot source code files. They should be held in a safe place that is not public.
Error Messages
Thus far, I have made error messages throughout the bot using the following pattern. These messages are sent to standard output(terminal) when the bot has an error.
Due to the structure of discord and the bot, exceptions and errors DO NOT crash the bot regardless if they are caught or not. With this in mind, we still want to catch all possible exceptions and errors and display error messages. This will make debugging easier and minimize unexpected outcomes of faulty code.\
Syntax:
Error: error message [function tag / identifiable name]
Example:
Error: config file could not be found [main::getToken]
- In this instance ‘main’ is the name of the file and ‘getToken’ is the name of the function.
- Typically, the first name on the left of the double colon will be the name of the class. Although, this function does not belong to a class so I made it the name of the file. Following this, if this code did not belong to a function, the tag would read: [main].
Making a New Feature
How to Get Started Developing New Features
Adding a New Cog
- Create a new Python file in the cogs/ directory, e.g. my_feature.py.
- Define a class that inherits from commands.Cog and decorate it accordingly.
- For example:
from discord.ext import commands
class MyFeatureCog(commands.Cog):
def __init__(self, bot):
 		self.bot = bot

@commands.command()
    	async def my_command(self, ctx):
        		await ctx.send("Hello from my new feature!")

def setup(bot):
    	bot.add_cog(MyFeatureCog(bot))
- Import functions from
utils/helpers.pyin your cogs:
import utils.helpers as helpers
- Use functions in
utils/helpers.py:
variable = helpers.function(arguments)
# or,
helpers.function(arguments)
Best Practices
-
Keep Cogs Focused: Each cog should focus on a specific set of related commands or functionality to maintain clarity and organization.
-
Use Helper Functions: Utilize
helpers.pyfor any common functionality that may be used in multiple cogs. -
Documentation: Comment and document code in your cogs and helpers to make it easier for team members to understand the purpose and usage of code.
Getting Data
Getting data from Discord:
You can get data regarding the discord server environment using parameters to the function when it is in a command decorator. [@commands.command()]
Parameters:
Ctx- Member -> discord.Member: This will give an object that contains data on the member that sent the message. This data can be accessed using the
.character. Such as member.roles for a list of roles the member is enrolled in. The member can also be accessed usingctx.author.
- Member -> discord.Member: This will give an object that contains data on the member that sent the message. This data can be accessed using the
Code Testing
Unit Testing
Unit testing is the practice of testing individual units or components of code to ensure they work as expected. A unit refers to the smallest testable part of an application, such as a function or a method. Unit tests typically focus on testing the logic within functions, ensuring that each part of the code behaves correctly.
In unit testing:
- Tests are automated and repeatable.
- The goal is to test a single functionality in isolation, without dependencies on other parts of the code or external systems (like databases or APIs).
- Unit tests usually mock or stub external dependencies to ensure that the function or method is the only thing being tested.
Benefits of Unit Testing
- Catches bugs early: Writing tests forces you to think about edge cases and logic. Bugs are easier to fix when caught early.
- Improves code quality: Writing tests often leads to better, more modular code as you design your code to be testable.
- Helps with refactoring: Unit tests provide confidence that your code works as expected when you make changes or refactor.
- Documentation: Tests can serve as documentation for how a function is expected to behave. {% endtab %}
{% tab title="Bot Examples" %}
How Unit Testing Helps with Developing Your Discord Bot
If you are developing a Discord bot, unit testing can be extremely helpful in ensuring that your bot behaves as expected. Here are a few ways unit testing can benefit you:
1. Testing Bot Commands
Discord bots often have commands that perform actions when a user types a command. Unit testing can check that the bot responds correctly under various conditions.
- Example: Test that the
!hellocommand sends the correct reply message ("Hello, User!"). - How it helps: Ensures that commands like !help, !ban, and others work reliably, even if the code changes.
2. Testing Event Handlers
Your bot responds to events, such as when a new user joins the server or a message is sent. Unit tests can verify that the bot reacts correctly to specific events.
- Example: Testing an event handler that sends a welcome message when a new user joins the server.
- How it helps: Helps ensure that your event listeners don't break when the bot code changes.
3. Testing External API Calls
Many bots interact with external APIs (e.g., fetching weather data or interacting with a database). Unit tests can mock external services to ensure that the bot handles API responses correctly.
- Example: Testing a function that retrieves data from a weather API and responds to the user with the weather information.
- How it helps: Ensures that even if the API changes or goes down, your bot will continue to work with mock data.
4. Testing Database Interactions
If your bot interacts with a database (e.g., storing user preferences or storing logs), you can unit test database queries to ensure they work as expected.
- Example: Verifying that a user's settings are correctly saved and retrieved from a database.
- How it helps: Prevents bugs related to data persistence, like saving wrong data or failing to retrieve the correct data.
\
Python Examples
1. Setup the Environment
First, make sure you have the necessary libraries installed:
Command: pip install pytest discord.py
- discord.py: The library used to create the Discord bot.
- pytest: A testing framework.
- unittest.mock: A module used for mocking objects in tests.
\
2. Example: Testing a Simple Discord Command
Let’s say you have a simple Discord bot command that replies with a greeting when a user types !hello.
bot_commands.py
import discord
from discord.ext import commands
bot = commands.Bot(command\_prefix="!")
@bot.command(name="hello")
async def hello(ctx):
  await ctx.send(f"Hello, {ctx.author.name}!")
Now, you want to write a test to make sure the !hello command sends the correct greeting message.
3. Unit Test for the !hello Command
You’ll use unittest.mock to mock the ctx (the context that contains information about the message) and the send method to avoid sending actual messages on Discord.
test_bot_commands.py
import pytest
from unittest.mock import MagicMock
from bot_commands import bot, hello
@pytest.mark.asyncio
async def test\_hello\_command():
# Mock the context (ctx)
ctx = MagicMock()


# Mock the send method

ctx.send = MagicMock()

# Simulate a user with the name 'TestUser'

ctx.author.name = 'TestUser'

# Run the command

await hello(ctx)

# Check that the send method was called with the expected message

ctx.send.assert\_called\_with('Hello, TestUser!')
Explanation of the Test:
- pytest.mark.asyncio: This decorator is used to run asynchronous tests. Since Discord bot commands are asynchronous (using async def), we need to run them as async tests.
- MagicMock: We use MagicMock to create mock objects for ctx and its send method. This allows us to simulate a Discord context without actually sending messages to Discord.
- ctx.author.name = 'TestUser': We simulate that the author of the command is a user named "TestUser."
- assert_called_with: This checks that the send method was called with the expected message.
4. Example: Testing Event Handlers
Let’s say your bot sends a welcome message when a new member joins the server. You can test this event handler similarly.
bot_commands.py
@bot.event
async def on\_member\_join(member):
  channel = discord.utils.get(member.guild.text\_channels, name='general')
  if channel:
    await channel.send(f"Welcome to the server, {member.name}!")
Now, let's write a test to ensure the on_member_join event sends the correct welcome message.
test_bot_commands.py
from unittest.mock import MagicMock
import discord
from bot\_commands import on\_member\_join

@pytest.mark.asyncio
async def test\_on\_member\_join():
  # Mock the member object
  member = MagicMock()
  member.name = "NewUser"
  member.guild.text\_channels = \[MagicMock(name="general")]

  # Mock the send method
  member.guild.text\_channels\[0].send = MagicMock()

  # Call the event handler
  await on\_member\_join(member)

# Check that the send method was called with the expected message

member.guild.text\_channels\[0].send.assert\_called\_with("Welcome to the server, NewUser!")
Explanation:
- Mocking member: We create a mock member object and set its name attribute to simulate the new user.
- Mocking text_channels: We mock the text_channels list to simulate that there is a channel named "general."
- Checking the send method: We verify that the bot sends the correct welcome message to the "general" channel.
5. Testing External API Calls (Mocking API Responses)
Many bots interact with external APIs (e.g., weather data). Let's mock an API call to show how you can test these interactions.
bot_commands.py
import requests
import discord
from discord.ext import commands

bot = commands.Bot(command\_prefix="!")
@bot.command(name="weather")
async def weather(ctx, location):
  # Simulate an API request to get weather data (mocked in the test)
  response = requests.get(f"https://api.weather.com/{location}")
  data = response.json()
  await ctx.send(f"The weather in {location} is {data\['temperature']}°C")
To test this, we can mock the requests.get method to avoid making real HTTP requests.
test_bot_commands.py
import pytest
from unittest.mock import patch, MagicMock
from bot\_commands import weather

@pytest.mark.asyncio
async def test\_weather\_command():

  # Mock the context
  ctx = MagicMock()
  ctx.send = MagicMock()

  # Mock the API response
  mock\_response = MagicMock()
  mock\_response.json.return\_value = {"temperature": 22}
  # Use patch to mock requests.get
  with patch("requests.get", return\_value=mock\_response):
    await weather(ctx, "London")


ctx.send.assert\_called\_with("The weather in London is 22°C")
Explanation:
- patch("requests.get"): This replaces the real requests.get method with our mocked version that returns the mock response.
- Mocking the json() method: We simulate the response from the weather API by setting mock_response.json.return_value to return a dictionary with the expected temperature data.
- Verifying the response: The test checks if the bot sends the correct weather information.
Running the Tests
To run the tests, simply execute the following command: pytest test\_bot\_commands.py
KeyCloak SSO R&D
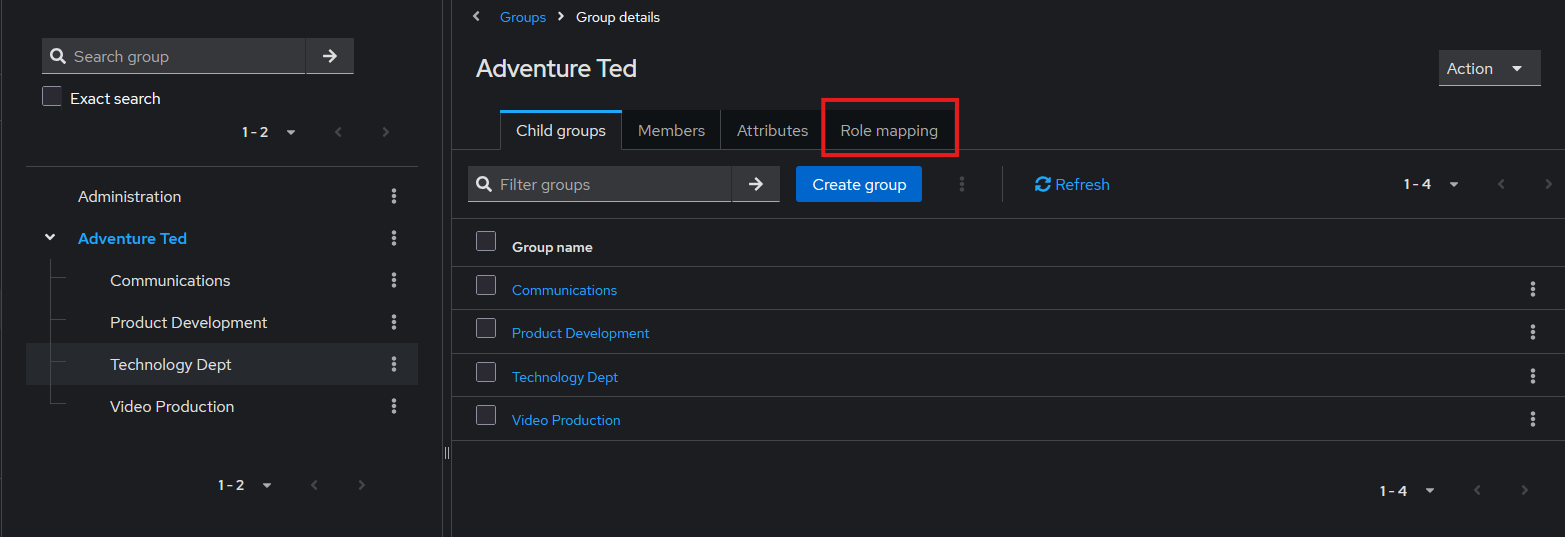
Created main group for the Adventure Ted family. Then, created child groups for separate departments. This allowed easier role assignment through inheritance.
(This process outlines the steps to create a default role mapping for typical end user access)

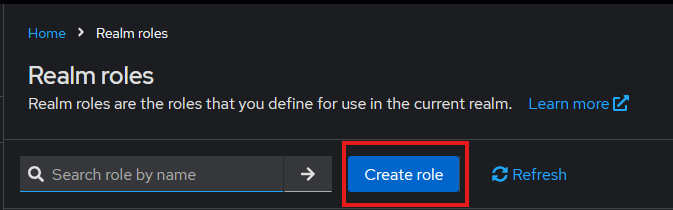
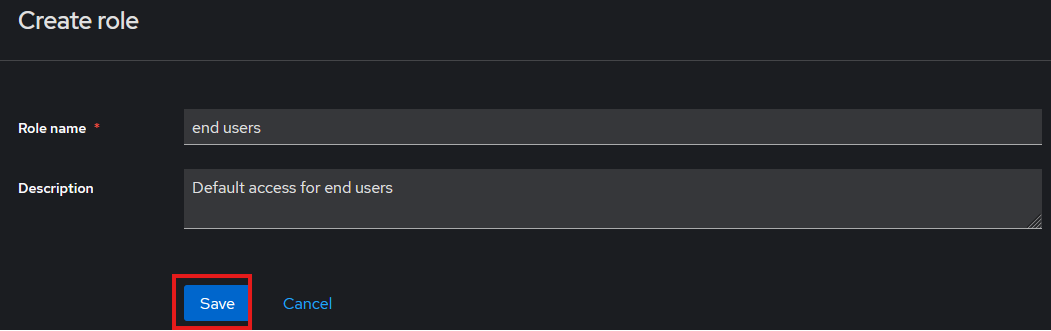
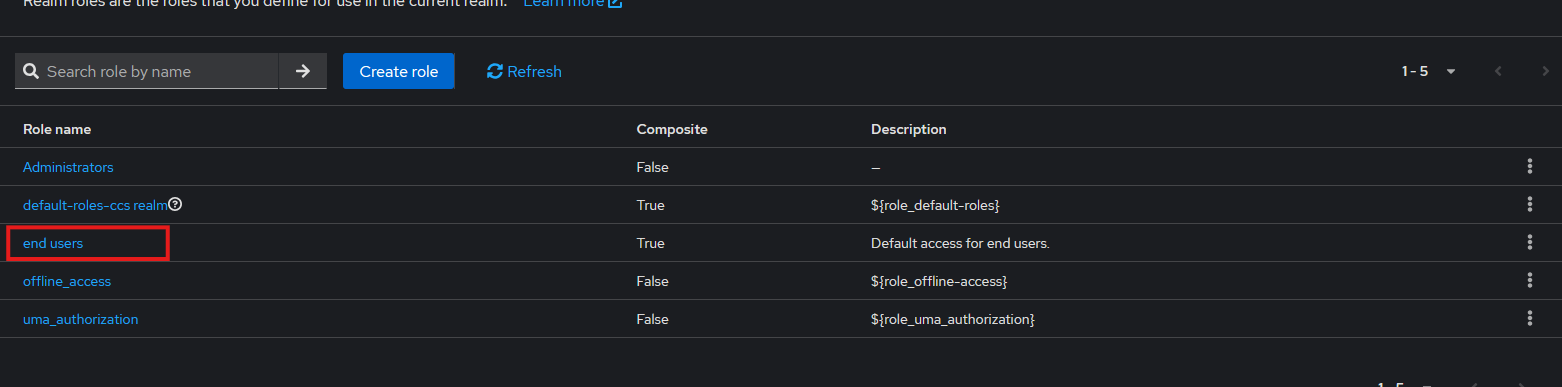
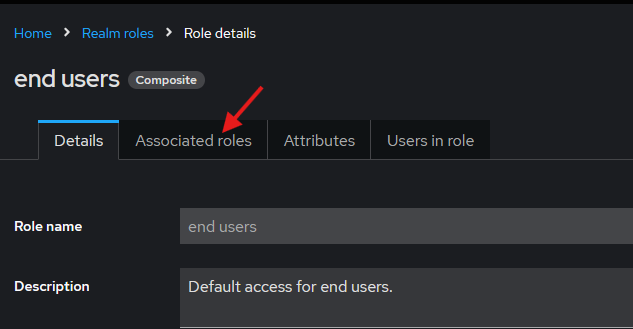
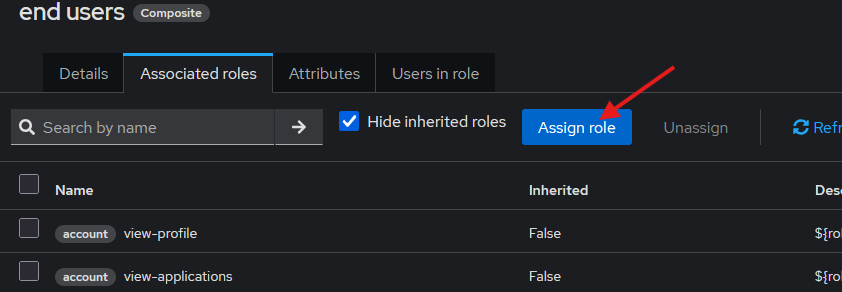
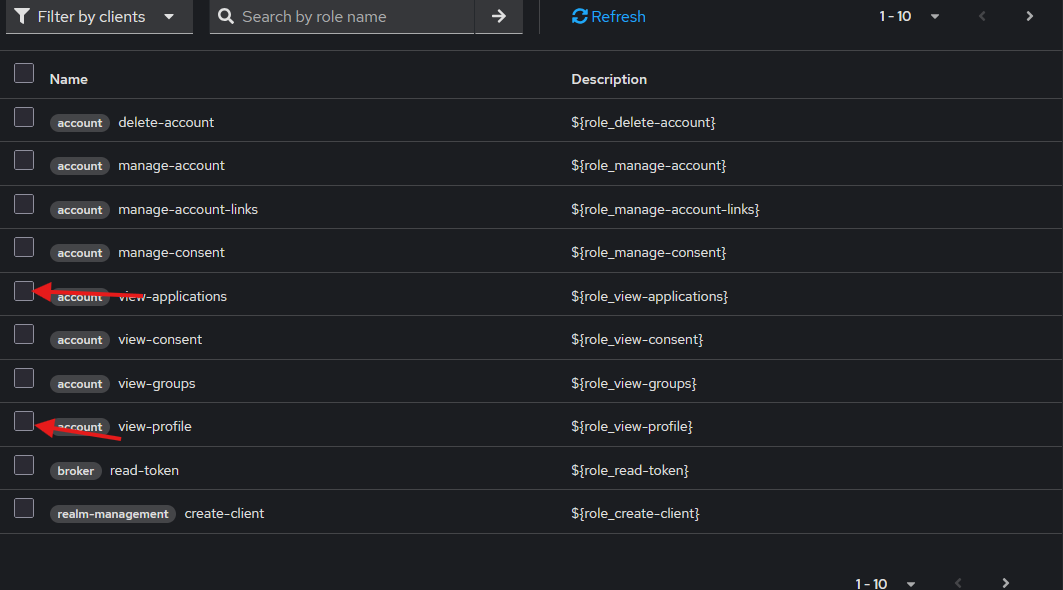
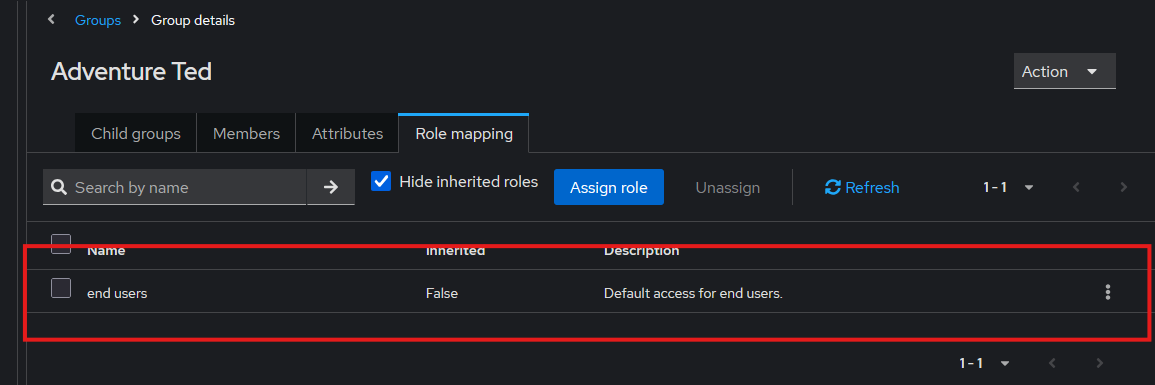
(Assigning the composite role just created allows basic access for all users in child groups of Adventure Ted)
Next order of business left here for direction for myself or Ron
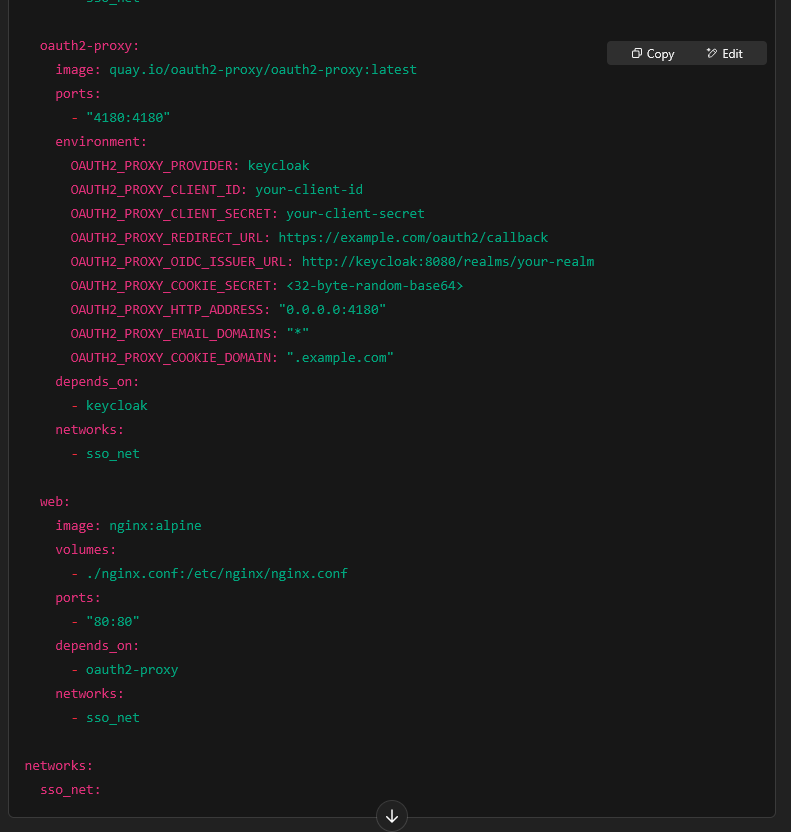
Oauth2 compose.yaml example
nginx.conf example to proxy all subdomains to oauth2


keycloak configuration once the other two are set up…
Seems we may have to create a realm per department, or find some other solution within to have each dept go to their respective resources. will continue digging.
Ts stuff is proving to be quite a pain. Perhaps and overhaul to a different solution. If only I had friends :C (I'm so alone)
Git/GitHub Workflow
Prerequisite Knowledge
- Git Practices - for a quick reference so interns can familiarize themselves with Git/GitHub
- How to Write a Git Commit Message - tutorial on best practices for creating Git Commit messages
- Git/GitHub Workflow - for our organization-specific approach to Git/GitHub workflow